maandag 16 september 2013

Rice

It sounds easy, but cooking rice requires some skill. The perfect rice should be glazy and al dente, not rough in the mouth. It should be whole rice, not broken. It should not be too sticky, but grainy. So let's go over all the parameters. We will discuss the sort of rice, rinsing, soaking, cooking and resting.


There are different sorts of rice. Some of them need more water than others. Brown rice needs the most water. Then we have the long grains, mid grains, that need less water. And finally we have the Indian style of rice, like Basmati and Jasmine rice from Thailand, which need even less water. So choose well. I like to eat Jasmine rice.

If you have chosen your rice base, you will need to decide if you want to rinse it. I would recommend to do so, to get rid of all the dust and starch. The removal of starch will decrease the risk of having sticky rice. If you do insist on having sticky rice, go ahead and don't rinse. But if you want the glaziness on your rice, I would rinse it. To do that you just add cold water to your rice, rinse it and repeat until the water is starting to get clearer. While rinsing it, you must polish the rice by working it through your fingers. If you don't, you will get gooey rice. After rinsing, make sure to get rid of all the water.

Next on, you add the accurately measured amount of water to the rice. The following list gives you the right amounts of water you need for each cup of rice.
  • White, long grain - 1 3/4 cups of water per 1 cup of rice
  • White, medium grain - 1 1/2 cups of water per 1 cup of rice
  • White, short grain - 1 1/2 cups of water per 1 cup of rice
  • Brown, long grain - 2 1/4 cups of water per 1 cup of rice
  • Parboiled - 2 cups of water per 1 cup of rice
  • Jasmine or Basmati rice - 1 cup of water per 1 cup of rice

When you have finished adding the right amount of water, you then will have to soak the rice for 30 minutes in cold water. This will make the rice less brittle, so that you don't end up with broken rice. And it will help expand the rice to maximum length. Soaking the rice is a must for Thai and Indian style rice (Jasmine and Basmati rice). The Japanese call this: "softening the rice". After the 30 minutes of soaking, you are ready to cook the rice.

If you want you can add a little salt or butter and experiment with that. Now you plug in the rice cooker and wait till all the water evaporates as we are in "cooking" mode. We call this the absorption method of rice cooking. At some point, the temperature in the rice cooker will be 100 °C. The water will be entirely evaporated and turned into steam. From then on, the rice cooker will turn itself off and stay in "keep warm" mode. This is very important to know. During the "keep warm" mode you will have to let the rice rest for 15 minutes. This way the texture of the rice will become more uniform as the moisture distributes itself. If you don't let it rest, the rice at the bottom will be wet, while the rice at the top is more fluffy. Also make sure that the lid stays on at all times, because you don't want to lose steam as this will result in improperly cooked rice.

Keep in mind that the amount of water you add in the rice cooker will determine how long you will cook your rice. The more water you add, the longer it cooks, because it will take longer to evaporate all the water before the rice cooker comes into "keep warm" mode.

Conclusion? Cooking rice isn't a quickie, you need more than an hour of effort to cook the perfect rice!

maandag 19 augustus 2013

Bokkenpootjes

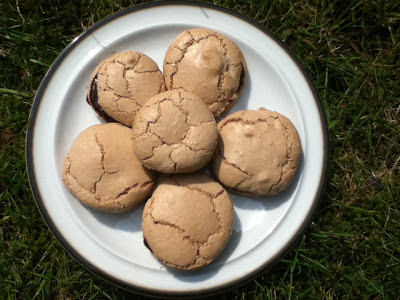
Bokkenpootjes are some sort of macarons, but made in a different way.

Macarons and bokkenpootjes both have sugar, almonds and egg whites. But the bokkenpootjes have a little bit flour in it too and they are fluffier. It's mostly the shape that's different and the texture is lighter than macarons.

The paste between the two biscuits is called "butter cream".


So I just wanted to try making these long shaped "macarons".

The following link gives a video of how I will make it.

How to make the biscuit:


You need:
- 250 g broyage (70% almond powder and 30% powder sugar)
   = 175 g almond powder + 75 g powder sugar
- 40 g flour
- 200 g egg white
- 225 g sugar
- some salt

Whip the egg white with the sugar until soft peaks. Add the flour to the broyage, mix it. Then add it to the whipped egg white.

Make long shapes of the pastry on an oven tray. Bake it in the oven for 15 minutes.


How to make the butter cream:

You need:
- 250 ml milk
- 50 g sugar
- 2 egg yolks
- 1 table spoon of flour
- 250 g butter
- 60 g powder sugar

Add milk and half the sugar in a pan and warm it up. Mix the egg yolks with the other half of the sugar in a bowl and then add the flour to it. Put this egg yolk mixture in the pan with milk. Cook it on low heat and then let it cool down. We call this "confectioner's cream".

Mix the butter and the powder sugar. Then mix it with the confectioner's cream.


How to make the Bokkenpootjes:

Add the butter cream in between two biscuits and dip them in some molten chocolate.

The result?

This was my pastry:

These were the "bokkenpootjes":

Conclusion:

These are the most work-intensive things I have ever made. I gave up on the chocolate as it was too much work. My confectioner's cream wasn't right the first time because the heat was much too high, so I had to make it a second time on lower heat. Then I didn't have enough butter for the butter cream. There was so much weighing and mixing and cooking and baking to make such little things. So many pots and pans that I needed to make it. I'm not going to make these again, that I'm sure of. It's not worth it.

vrijdag 16 augustus 2013

Brusselse Wafel

I said I wasn't going to make waffles again, but that was only for Luikse Wafels. I'm now trying to make Brusselse Wafels. The nice thing about these waffles is that there is no sugar involved! You will need to put ice cream on top of it, or add some whipped cream with strawberries.


I took this recipe from Jeroen Meus:
http://www.een.be/programmas/dagelijkse-kost/recepten/brusselse-wafels

You need:
- 1 egg white
- 1 egg yolk
- 150 g self rising flour
- 50 g molten butter
- 125 g milk
- 125 g warm water
- 3 g dry yeast or 9 g fresh yeast

First you activate the dry yeast by adding yeast to the milk and water mixture. Do not overheat it, the temperature may not go above 35 °C. Then you add this milk/yeast mixture to the egg yolk and mix it. If you use fresh yeast, you take 3 times as much the amount of dry yeast. For example: 3 g dry yeast is 9 g fresh yeast.

Next on, slowly add the flour to the mixture and keep mixing it. Then add the molten butter to the mixture. Add a bit of salt if you want.

Finally, whip the egg white until stiff and fold it to the mixture.

Let it stand for 20 minutes in a warm place of 35 °C at 75% humidity.

Then bake it in a waffle iron at hottest temperature.

This is the resulting mixture, it's a pretty liquid dough:


Now I bake it and this is the final result:


They were perfect! Crispy on the outside, creamy on the inside and no yeast taste.

zondag 11 augustus 2013

Kaasbroodje

A "kaasbroodje" is a dutch speciality (especially those from Panos are really great) and is actually cheese with roux wrapped in crispy puff pastry. It's one of my favourite snacks.


To produce the cheese-milk-flour-butter mixture I used this recipe from Fans of Flanders.
In this video you see how they make "Cheese Croquettes". But instead of making a cheese croquette, you make a "kaasbroodje" in puff pastry.

To make the cheese mixture do this:
- cook some flour with butter
- add milk
- add white wine
- add cheese (e.g. Old Bruges Cheese or Leerdammer)

Make sure you add enough flour to the butter to make a pretty thick pastry. Cook the roux long enough to get rid of the flour taste. Add the milk until the pastry gets smooth, but stays thick. Then add some wine and then some cheese. There are no recipes for this, just experiment, it's not that difficult. Don't forget to season with pepper and salt.

Then wrap the cheese mixture into some puff pastry and bake it at 180 °C in the oven.


donderdag 1 augustus 2013

Spinach Quiche

Quiche is not a very difficult thing to make. What you need are eggs and vegetables. You will also need pastry. I like to use puff pastry.


I use this recipe:
- 2 eggs
- 9 egg yolks
- Two cups of heavy cream (about 500 ml)
- Salt and pepper
- 500 g spinach or broccoli to fill the bottom of the pan
- Gruyère cheese
- Parsly

First, you bake the pastry till it's crispy. Second you mix the eggs, egg yolk and the cream. Add some spices to it. You can heat it up so it gets baked faster. The spinach should be cooked in hot water for half a minute and then you chop it in little pieces. Add the spinach to the pastry bottom and fill it in with the egg/cream custard.

Then bake it for about an hour on 170 °C. Ten minutes before end you can add some gruyère cheese. Or you can also add the cheese to the custard. It's how you like it. Not too difficult really.

This is the end result:


The taste and texture was pretty good. Not too much liquid, not too dry. Just perfect.

zondag 28 juli 2013

Lemon Mousse Parfait

Today I went to a restaurant and ordered a "Lemon Mousse Parfait", I have never ever heard of a parfait and never tasted it. It was really tasty!


It tasted like ice cream, because it was very cold. But it actually wasn't ice cream. It was more of a mousse. So I wanted to make one myself.

What you need for a parfait is basically heavy cream, sugar, egg yolk. That's it. Then you add the taste you like, for example: lemon juice, lemon zest or mangos, whatever you like.

I took this recipe:
finely grated zest and juice of 3 limes
4 egg yolks
75g caster sugar
300 ml double cream

1) First mix the egg yolks with the sugar over a hot water bath. Mix until the mixture turns pale and stop at 80 °C. Let it cool down in ice water.
2) Mix the egg yolk/sugar with the lime juice and zest.
3) Whip the cream until soft peaks and fold it with the egg yolk mixture.
4) Put in freezer for 8 or more hours.

It's that simple. Now let's see if making it is as simple as it seems.

----------------------------------------------------------------------------------------------------

The next day, I tried to make it and it sure as hell wasn't easy.

Let's go over all my mistakes.

First off, I made the egg/sugar mixture first, which was a mistake, because the time to make the whipped cream was much longer than the time to make the egg/sugar mixture. By the time that the cream was whipped, my egg/sugar mixture started to deform and harden (because the bowl was still hot and I didn't cool it down in ice water). But it wasn't all that bad. What we learn here is: first whip the cream, then make the egg/sugar mixture. And cool down the egg/sugar mixture with cold water.

Egg and Sugar Mixture

Second, when I made the egg/sugar mixture (which was pretty easy to make), I used a warm water bowl while mixing. But I made the mistake to use the same warm bowl to whip the cream. The result was that I made butter out of it.

I made butter
Third, I had no idea how to whip cream. I mixed much too hard and I used a warm bowl to mix the cream. These are the worst conditions to whip cream. The right way is to follow these steps:
  1. Always use a cold bowl, cold cream, cold whip.
  2. Try to use cream that is as old as possible, fresh cream doesn't work well.
  3. Use cream that has a very high fat percentage, preferably 40%. I used 30%.
  4. Do not mix the cream at high speed, use medium speed. Otherwise you risk making butter.
  5. Mix the cream with a mixer and your arm should make large circular strokes to get the air in.
  6. When you see the cream thicken, you will have soft peaks after a few minutes and that's what you're looking for.

I tried to whip a second time and it worked. Now for the taste, I added blackcurrant because the garden had those.
Blackcurrant
I mixed egg/sugar with some blackcurrant juice and added that to the whipped cream.

Blackcurrant Parfait
And finally put it in the freezer. I have the feeling that I didn't whip the cream long enough.

After three hours in the freezer, I couldn't resist to taste it. The taste was pretty good, but the texture wasn't good. I tasted ice crystals, normally you wouldn't taste ice. This means I either added too much blackcurrant juice, or I didn't whip the cream long enough. Next time, I will whip the cream longer. Another issue is the sugar. I added half the amount of the sugar, but that was a mistake too. The sugar is crucial to prohibit the ice crystals from forming as sugar lowers the freezing temperature.

End Result
Notes:
- It is best to mix the egg yolks as much as possible, until it gets very hard and the color turns almost white.
- Always put the mixture in the freezer as soon as possible, because the fluid and the fat should be held together.
- Do not add too much liquid to the mixture.
- Make sure all your ingredients are ice cold when mixing them together, otherwise you will get separation of fluids.


Other Recipes:
Now if you think you can't do anything with the left over egg whites. This lemon parfait recipe uses egg white only.

INGREDIENTS:

  • 60 ml (1/4 cup) water 
  • 180 ml (3/4 cup) sugar 
  • Grated zest of 2 lemons 
  • Juice of 1 lemon 
  • 3 egg whites 
  • 1 ml (1/4 teaspoon) cream of tartar 
  • 375 ml (1 1/2 cups) 35% cream 
  • Seasonal berries, for garnish 
  • Tuiles or other thin, crisp cookies 


PREPARATION:

Line a 13 x 23-cm (5 x 9-inch) loaf pan with plastic wrap.
In a small saucepan, bring the water, sugar and lemon zest to a boil. Simmer without stirring until a candy thermometer reads 112°C (234°F).
In a bowl, beat the egg whites and cream of tartar with an electric mixer. When soft peaks begin to form, add the hot syrup in a thin stream while still beating. Continue beating until stiff peaks form, 4 to 5 minutes. Cover and refrigerate for 30 minutes.
In a bowl, whip the cream. With a spatula, fold in the chilled meringue and the lemon juice.
Spread the mixture in the loaf pan. Cover and freeze for at least 3 hours.

Unmould and slice. Garnish with seasonal fruit and serve with a tuile or other delicate cookie.


If you want yet another recipe, here's one to make Coffee Parfait by Raymond Blanc:

Ingredients


Preparation method

  1. Whisk the egg yolks, sugar and dessert wine together in a large heatproof bowl until pale and fluffy.
  2. Set the bowl over a pan of barely simmering water and continue to whisk for 3-4 minutes, or until the mixture is pale and has thickened (the temperature of the mixture should reach about 78-80C/175F).
  3. Remove from the heat, set the bowl in a larger bowl of iced water and whisk again until cool.
  4. Whisk in the cayenne pepper and lemon juice. Set aside until completely cold.
  5. Whisk one-third of the whipped cream into the cooled sabayon mixture, then carefully fold in the remaining cream until just combined.
  6. Fold the coffee essence carefully into the sabayon until combined.
  7. Spoon the mixture into a 1.2kg/2lb 10¼oz loaf tin, levelling the top with a palette knife. Chill in the freezer for at least 12 hours, or until solid.
  8. When ready to serve, remove the coffee parfait from the freezer and dip the loaf tin into hot water to loosen the parfait from the tin. Run a blunt knife around the parfait, then turn it out onto a long rectangular plate.
  9. To serve, slice the coffee parfait and serve with caramel sauce or vanilla cream, if using. Sprinkle with chopped roasted nuts and dust with cocoa powder.

dinsdag 23 juli 2013

Melanzane: Egg Plant with Tomato Sauce and Mozzarella

The idea of this recipe comes from my brother-in-law. But I modified it a bit to my taste and my ingredients. People also call this a melanzane.

Basically you need:
  • 1 Egg plant
  • 3 Tomatoes
  • Mozzarella (Gruyère works too) 
  • Parmezan cheese
  • Spices (thyme, oregano, basil, pepper, salt, sugar, nutmeg, cinnamon...)
  • Ketchup
  • Red wine
  • Bread crumbs
First you cut the egg plant into long thin slices (2 cm x 8 cm). You stir fry them in a good amount of butter or olive oil, until they get soft and absorb all the fat. Add pepper, salt and spices to your taste. Then put the egg plant slices in a ceramic baking pan. Cover the egg plant layer with a second layer of mozzarella or gruyère. Add some parmezan cheese.

Second, you chop your tomatoes into little blocks, almost tomato concassé. Then you stir fry them at medium heat for about 15 minutes. Add some ketchup and red wine. Spice it up with thyme, oregano, basil, cinnamon, nutmeg, salt and pepper. The most important part is to add sugar here, so that the sourness of the tomatoes will go away. The ketchup will help a little bit here. To get some binding, you can add butter.

Now put the tomatoes onto the egg plant/cheese mixture and add a layer of bread crumbs. Sometimes people add a beaten egg or two to it before baking it, it gives an extra touch. Try it.

Finally put the entire baking pan in the oven at 180 °C for about half an hour.

It was delicious, especially the combination of cheese and tomatoes gave the extra touch to the flavor. One comment though, I had to bake it longer so that the bread crumbs can become crispy. I didn't bake it long enough, because I was afraid the sauce would become dry. But it was just right.

zondag 21 juli 2013

Pasta With Mushroom Cream Sauce

Making pasta is like being a magician. There are so many combinations you can make when making a mushroom cream sauce.


First off you need to select your ingredients. You need pasta, mushrooms, cream (+ milk), white wine and egg yolks.

1) Pasta

This ingredient is the easiest one, just buy some penne or fettuccine from the grocery store and cook it with two table spoons of salt at very high heat. The water needs to boil hard before adding the pasta. Continue to mix the pasta while cooking it. Do not overcook, it should be "al dente". Not too hard, not too soft. Just right. Make sure that your sauce is ready when your pasta is ready, because you need to mix the pasta together with the sauce.

2) Mushrooms

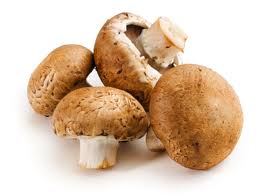
I like to use brown button mushrooms, because it gives a brownish color to your sauce. Just chop them how you like it. I mostly chop them in thick slices, so that it gives off its flavor to the sauce. Then you take a baking pan, add some butter and sautee them at the highest possible heat. You can season the mushrooms with some oregano/basil/thyme/pepper.
3) White Wine

Then add some white wine to cool the mushrooms down. Let the wine evaporate and then you add the cream.

4) Cream

The cream is one of the more difficult parts of the cooking process, because there are different forms of cream. First off, always use heavy cream, meaning cream with a high fat content above 30%. Otherwise your sauce will separate.

You have the following cream products:
  • Cream
  • Crème fraîche
  • Sour Cream
Cream (heavy cream) is the most basic one, it is liquid and has a 35% fat content. The French call it: crème fraîche liquide. It is entirely possible to use heavy cream in your mushroom sauce. Just add the cream to the mushrooms, cook it for a bit, add salt and there you have it.

Crème fraîche on the other hand is going a step further. This is cream that has been made sour by adding bacterial culture. The pH of crème fraîche is about 4.5 which is more sour than heavy cream, which has a pH of 6.6. In France, they call this fermented version: crème fraîche épaisse. Meaning, the thick version of cream. So if you want to a have a bit of freshness in your sauce, you can use crème fraîche. The end result will be a bit more sour.

Sour cream is the same as crème fraîche, with two differences: less fat and more sourness. Sour cream has a fat content of 10% in Belgium and 16% in France. In France they call this: crème aigre. I would not advise you to use sour cream in hot sauces, but you can add this in the last two minutes of your sauce, just at the end to get it more sour to your taste. Normally you use sour cream to make cold dipping sauces. For example: 225 g mayonnaise + 200 ml sour cream + parsley + mustard + onions = great dipping sauce.

For all of these creams above, you just need to add those creams into the mushroom mix and let it cook at a low heat. Add milk to make it more liquid. Do not overcook the cream, otherwise you will get into trouble: separation of the sauce, lumps of protein will emerge. The duration of cooking will determine your sauce texture. I like to have a more liquid texture rather than a thick texture, because it will be too heavy. If you do get lumps (curdling), then you need to remove the sauce from the heat and whisk it firmly to break the protein lumps. Also adding some flour to the sour cream mixture helps because the flour coats the proteins and stops them from collecting together. Remember, sour cream doesn't like heat.

If it's too light in texture, you can add some butter to it. If it's too thick in texture, you can add some milk or cream to it.

5) Egg Yolks

The key ingredient and probably the most difficult one to do right is egg yolk and acts like a liaison for the sauce. The egg yolk(s) can be added to the sauce or they can be added to the cooked pasta. Just make sure you don't overcook the egg yolk. Egg yolk begins to coagulate at 65 °C - 70 °C, while egg white coagulates a 63 °C - 65 °C. So make sure to remove all egg white from your egg to get the best result. Also make sure your paste isn't hotter than 70 °C. Otherwise you will have pieces of cooked egg yolk in it. You will get scrambled egg pasta...

If you decide to add the egg yolk to the sauce, make sure the sauce isn't blazing hot. First mix the egg yolk with some cream to get a liquid egg yolk/cream mixture. This will reduce the risk that the eggs will overcook when adding them to the hot cream sauce. Add the egg/cream mixture when the sauce has cooled down a bit (preferably to 65 °C), otherwise you risk cooking the eggs and you will have tiny pieces of egg in the sauce.

If you decide to add the egg yolk to the pasta, make sure your pasta is wet and at the right temperature. Dry pasta doesn't mix too well with the egg yolk. Also, don't add the egg yolk immediately after you cooked and strained the pasta as you will cook the egg yolk. Just leave the pasta on a plate or bowl for a few minutes and then mix the egg yolk in it. Then immediately add the (not blazing hot) mushroom cream sauce to it.


=> The end result will be a delicious pasta with mushroom cream sauce.


Conclusion:
I have some issues with the end result. First off the sauce was too thick. Next time I'm going to add more milk to it, I want the sauce to be a bit liquid. Second, the sauce was a bit too sour to my taste, it would be better to mix it with some heavy cream to get the pH a bit higher. Third, the wine evaporated immediately, maybe I should add more wine to it and lower the heat more. Next time I will also add sour cream with some flour to prevent the curdling. The egg yolk addition went pretty smooth. It was edible, but there is room for perfection.

woensdag 17 juli 2013

Crème Brûlée

I have never made or even eaten crème brûlée. But it's never too late to learn.

I took the following video and am trying to do as the video says.


My recipe will be the following for 4 people:
  • 1/4 l milk
  • 1/4 l cream
  • 1 pod of vanilla
  • brown sugar
  • 6 egg yolks
  • 95 g sugar
I mix the yolks with the sugar. It's not necessary to mix it too much, just a little bit is enough. Otherwise we have air and we don't want that.

Egg yolk and sugar
I mix the milk with the cream and warm it up. Then I add the milk/cream to the egg yolk. And that's it, as easy as taking candy from a baby.

Bain-marie
Ready for cooking in the oven

Then I cook it for 45 minutes at 145 °C in a bath of water.

Then I add the brown sugar and heat it up in the oven at 220 °C, because I don't have a torch.


This is the easiest recipe I have ever made. It was very tasty and especially very smooth. It was like pudding, but even smoother. I like it very much. Too bad I don't have a flame torch. Next time, when grilling the sugar, wait for the oven to be 220 °C first, then put the crème brûlée in there. Otherwise you overcook them while the sugar doesn't melt fast enough.

PS: I only found out days later that you serve it cold instead of hot. So that the caramelization can happen easier on a cold creamy layer.

zaterdag 6 juli 2013

Macarons

Today, me and my niece Janny were going to make macarons.

The French are the inventors of macarons (I think). So if we make macarons, we need to find a recipe of the French chefs.

I took this one.

- 210 g powder sugar
- 145 g almond powder
- 75 g pistache powder (I used almond powder)
- 85 g x 2 egg white
- 200 g table sugar
- 5 cl water
- colorant (I used cacao powder)


Macarons cups:
First mix the almond powder with the powder sugar and 85 g of egg white.

Then mix the second 85 g egg white with a mixer until it is white. Then add the molten sugar to the egg white while mixing. Then we get a sort of meringue.

Then we mix the first mixture with the second mixture and get the macaron paste.

I found out that creating the mixed egg white was much easier when using molten sugar at 119 °C. It goes much faster and it makes the end result much stiffer. So I learned something new.

Now bake them at 170 °C for 12 minutes.

Macarons filling:
I used an easy recipe. Just warm up 50 g of cream and then add 100 g pure chocolate to it. You can add some almond powder if you want.

This is the macarons paste. It was difficult to make them round.


This is the final end result and they were very delicious!

I know what I'm going to make for my birthday.


Now the second time I made it, it was PERFECT!


donderdag 27 juni 2013

Moelleux Au Chocolat: Day 2

Today I'm going to use another recipe:


- 170 g chocolate
- 3 eggs
- 120 g sugar
- 55 g flour
- little bit salt
- 150 g butter

In little cups at 200 °C after having put them in the fridge for an hour.

I have 5 little cups and I will take them out of the oven one by one to see what happens during the course of time. At least one of them will be baked well enough to have this gooey inside.


Result:
This is very difficult to make. I didn't preheat the oven properly, next time I wait till the oven is exactly at 200 °C. It was still heating up while the cakes were in the oven. Even so, the amount of time the cakes need to be in the oven is very exact to the minute. One minute over time and your inside has become solid. This is what happened this time. I put it in there for 10 minutes and probably had to put it in there for 7 to 8 minutes.


maandag 24 juni 2013

Moelleux Au Chocolat: Day 1

This is a difficult one, especially the baking of it. You want it crispy outside and soft inside.

Here's the recipe:
80 g chocolate
3 eggs
150 g sugar
40 g flour
100 g butter

I'm going to try using 1 egg, so I divide by 3. And I'm going to cut back on the sugar.

I mix together the chocolate and the butter. I mix together the sugar and the egg. Then I add flour to the egg/sugar mixture. Finally I add chocolate and butter to the entire mixture.

This is what I got:


Now I put it in a 180-210 °C oven in a tiny, buttered, moelleux ceramic cup for about 15 minutes. (It will be better if you put it in the fridge for a few hours, but I don't want to wait. The reason it's better is because the inside will be cold and the outside will be warm. So the inside will be soft and sticky, while the outside is hard. We will get a nice gradient from inside to outside.)


And we get the result.


Hmm, I baked it a little bit too long. 16 minutes. Next time we do it with 10 minutes and I'm going to put it in the fridge first. I also think the cake is too soft on the outside, so next time I'm going to use 200 °C instead of 180 °C.

Some other recipes are totally different:

- 170 g chocolate
- 3 eggs
- 120 g sugar
- 55 g flour
- little bit salt
- 150 g butter

This second recipe looks a bit "darker" because it uses more chocolate. I think I'm going to try this one next time.

To see how I make the second recipe, go here:
http://katchum-kitchen.blogspot.be/2013/06/moelleux-au-chocolat-day-2.html

vrijdag 21 juni 2013

Gratin Dauphinois - Gratin of Potatoes: Day 2

I have retried making it. I did just the same, but now with 30% cream instead of 7% cream.
I still used a metal pan, just to see if the culprit was the cream itself.

As I suspected, it was the light cream all along. It wasn't the metal pan. The only mistake was that I didn't use full cream. But this time, I used full cream and the result was very good. I did use too much sauce this time, next time add as much milk/cream mixture to the level that you don't cover the potatoes entirely.

This might look gross, but it is very tasty. The sauce hasn't separated, but is very thick and creamy.

The thick sauce is bound together


Unlike the first time, where the sauce separated.

You can see that the sauce is shifted into water and fat particles

Go here to learn how to make Gratin Dauphinois.

zondag 16 juni 2013

Luikse Wafel: Day 2

Ok, I made the yeast dough.


Then we just knead the dough and add those together. Let's hope it works!

I had to add a little bit more flour, because it was too sticky. Mixing the pearl sugar wasn't easy. Some parts had too much sugar. So I had to distribute them from highly concentrated sugar parts to less concentrated sugar parts.


Now let's see what the result is.


The caramelization was ok. But the dough wasn't like it should be, I missed the stretchiness of the dough. Also, the recipe used too much sugar to my taste. It was like eating sugar instead of waffles.

Conclusion: it's better to buy one than to make one... I'll leave it to the professionals.


If you still want to make it yourself, here are the instructions.

zaterdag 15 juni 2013

Balsamic Mushrooms

A very fast recipe for balsamic mushrooms. Basically you just pan fry the mushrooms and add balsamico acid. Parsley works best with this dish.

You can also add a toast with the mushrooms, we call it "Toast Mushroom". Ideal for breakfast.